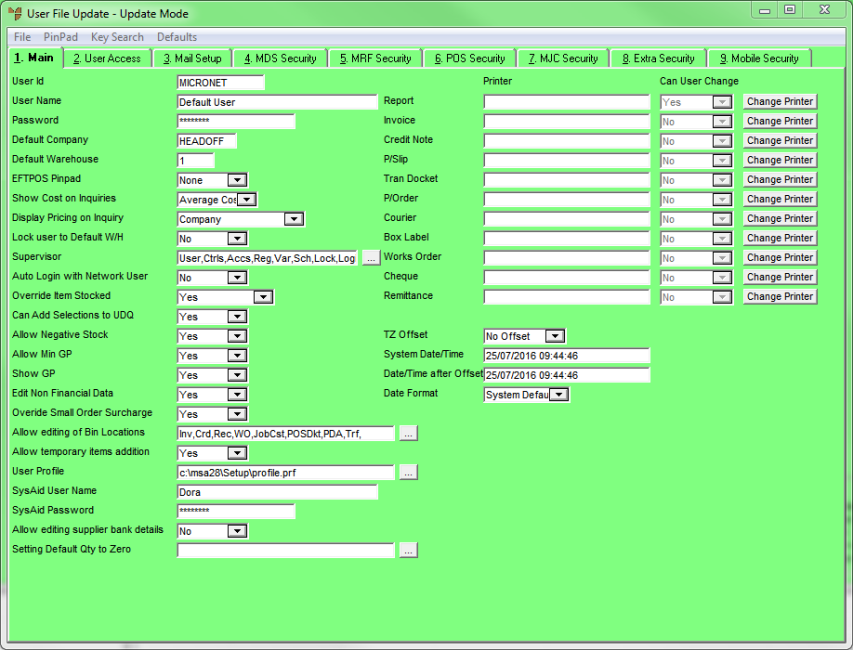
The User File Update screen - Main tab is where you setup general information about your Micronet users, such as their user name, password and the default printers for Micronet outputs such as invoices and purchase orders. Non-supervisor users can change their passwords on this screen.
2.8 Feature
Supervisor users can also use this tab to set up supervisor privileges for other users and to lock users out of Micronet while system maintenance is being performed.
To setup general user information:
Refer to "Adding a New User" or "Updating a User".
Micronet displays the User File Update screen - Main tab.
|
|
Field |
Value |
|
|
User Id |
Micronet displays the user ID for the selected user. If you are adding a new user, enter a unique user ID. This is usually the user's first name, initials and/or surname, but depends on your preferences or company policy. |
|
|
User Name |
Micronet displays the user’s name. If you are adding a new user, enter the user’s full name. |
|
|
Password |
Enter the password you want the user to login to Micronet with. For the security of your Micronet system, it is recommended that you use strong passwords. Strong passwords should:
A good guide is to use something that is easy for the user to remember but to substitute individual letters with numbers and special characters. For example, you could use your grandmother's birthplace - Casino - but enter your password as Ca$1no01. |
|
|

|
Technical Tip If you want users to login to Micronet automatically, bypassing the Micronet login screen, enter their network login name and password then select Yes in the Auto Login with Network User field below. If the user ID is more than 10 characters long, you will need to setup an active directory for the user on the User File Update screen – Extra Security tab. Refer to "Maintenance - Edit UserIDs - 8. Extra Security". |
|
|
Default Company |
If there is more than one company setup in Micronet, enter or select the user's default company. As Micronet allows for multi-company operation, this field determines the directory where each company's data resides. Each registered company requires its own directory area for its data storage. If an additional company number has been purchased, then a different default company would be used. Each different company can have different User IDs, User Names, Passwords and a data path associated with the new registration number. |
||
|
|
Default Warehouse |
Enter or select the default warehouse that this user sells products from, if required. You can leave this field blank. Micronet allows each company to have multiple warehouses. During the invoicing procedure, users can invoice goods from a particular warehouse. |
||
|
EFTPOS Pinpad |
If this user can process EFTPOS payments, select the default EFTPOS PINpad for the user. PINpads must already be setup (refer to "Installing PC EFTPOS and PINpad (Preferred Option)"). |
|||
|
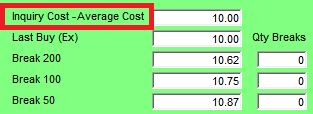
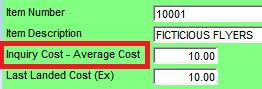
Show Cost on Inquiries |
Select whether you want item cost prices displayed on the main item inquiry screens for this user. Options are:
The option you select in this field is displayed for the user on both the main Item Inquiry screen and on the Enter Purchase Information screen when doing a purchase inquiry (refer to "Displaying the Item Inquiry Screen").
2.8 Feature Selecting a default buy price in this field also allows the user to change the buy price for items when entering a backorder, e.g. if a special price has been negotiated with a supplier. Refer to "Entering Backorder Lines". |
|
|
|
Technical Tip Cost prices can be removed from other reports and inquiries by using the Report Generator and locking the reports to the specific users involved. Refer to "Reports - Report Generator". |
|
|
Display Pricing on Inquiry |
Select the types of item pricing you want this user to see when performing inquiries. Options are:
|
|
Lock User to Default W/H |
Select Yes to prevent this user from changing their default warehouse during the processing of invoices and stock movements. Select No to allow the user to change their default warehouse. |
|
|
Supervisor |
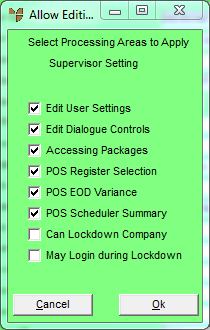
Select Yes if this user should have Supervisor access to Micronet, or No if they should not. Only supervisors can create other user IDs and change the access rights of users on all of the User File Update tabs. They can also approve discounts, and disable / enable fields on screens. Non-supervisor users can access the User File Update screen - Main tab but they can only change their passwords. They cannot access any of the other User File Update tabs. 2.8 Feature If this user is a supervisor, select the browse button (...) next to this field. Micronet displays the Allow Editing of Supervisor Functions screen.
Check the box for each Micronet function you want this supervisor user to have access to:
Select the Ok button. Micronet redisplays the User File Update screen with the selections listed in this field. For non-supervisor users, you should not check any of these fields. |
|
|
Auto Login with Network User |
Select Yes if you want Micronet to check the user's network login name and password and, if they exist with the same ID and password in Micronet, log them straight into the Micronet software without displaying the standard user login screen. Select No if you always want the user to login separately to Micronet. |
|
|
Override Item Stocked |
Select Yes to allow this user to draw from or post an item to a warehouse where the stocked flag has been set to No (i.e. the item is not stocked in that warehouse). This will allow the user to override the error message displayed and proceed. Otherwise select No. |
|
|
Can Add Selections to UDQ |
Select Yes to allow this user to create and assign user defined questions (UDQs). Otherwise select No. |
|
|
Allow Negative Stock |
Select Yes to allow this user to sell items where the sale sends the item's stock on hand to a negative figure. Select No if the user cannot make sales that would result in negative stock. This also depends on the setting in the Prevent Stock going negative field on the Invoicing Configuration screen (refer to "Edit - Program - Invoicing"). |
|
|
Allow Min GP |
Select to allow this user to sell below the product category minimum gross margin as set in the Product Category master file, otherwise select No. The minimum gross margin is set in the Minimum GP field on the Category File Update screen - Category tab (refer to "File - Product Category - Category"). |
|
|
Show GP |
Select Yes to allow this user to see the minimum gross profit set per item/category when entering item details for a POS docket, otherwise select No. |
|
|
Edit Non Financial Data |
Select Yes if you want to allow this user to edit non-financial data on current customer invoices – such as order number and delivery options – when recalling and reprinting invoices. If you don't want the user to edit this data while they are reprinting invoices, select No. |
|
|
Override Small Order Surcharge |
If you are using small order surcharges, select Yes to allow this user to change the amount that Micronet calculates using your Small Order Surcharge table. Select No to prevent the user from changing the automatically calculated amount. For information on setting up the Small Order Surcharge table, refer to "Edit - Program - Small Order Surcharge". |
|
|
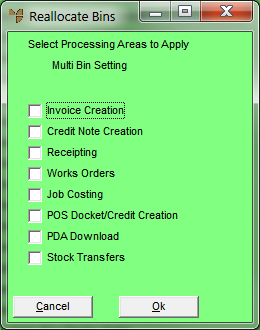
Allow Editing of Bin Locations |
If your Micronet system is setup for multiple bin locations, you use this field to allow the user to change the bin location selected by the system, or to prevent the user from changing the bin location. This setting only applies when the Allow Multiple Bin Locations per Item field on the Inventory Configuration screen is set to Main Bin Only or Priority Order (refer to "Edit - Program - Inventory"). Select the browse button (...) next to this field. Micronet displays the Allow Editing of Bin Locations screen.
Check the box for each Micronet process where you want to allow this user to change the bin location, then select the Ok button. Micronet redisplays the User File Update screen with the selections listed in this field. |
|
|
Allow Temporary Items Addition |
Select Yes if you want the user to be able to create temporary items during invoice creation, purchase order creation, auto purchase order creation, POS docket creation, MRF order creation and MJC job creation. This allows the user to quickly add a temporary (non-inventory) item to the Inventory master file during transaction processing, entering only a few important details. Select No if the user cannot add temporary items. |
|
|
User Profile |
2.8 Feature If your company saves user settings in profiles (rather than the Registry), enter the path and name of the profile file for this user, or select the browse (...) button to find the file. The file must be already setup and should have a .prf file extension. For more information about user profiles, contact your authorised Micronet representative. |
|
|
|
SysAid User Name |
2.8 Feature Enter this user's user name for accessing the Micronet Assist portal. When the user presses the F1 help key on a particular screen, Micronet will display the topic in the online user manuals that is specific to that screen (as long as the user is already logged into the manuals). |
|
|
SysAid Password |
2.8 Feature Enter this user's password for accessing the Micronet Assist portal. |
|
|
Allow editing supplier bank details |
2.8 Feature This setting only applies if your company requires two users to authorise changes to creditor/supplier bank details - i.e. the Confirm Security for Bank Account field on the MCL General Configuration screen is set to Yes (refer to "Edit - Applications - MCL - General"). Select Yes if this user is one of the users who is able to authorise changes to bank details, or select No if this user is not permitted to authorise such changes. When this is set to No, the Bank tab in the Creditor master file is greyed and the user cannot select it (refer to "File - Creditor - Bank"). |
|
|
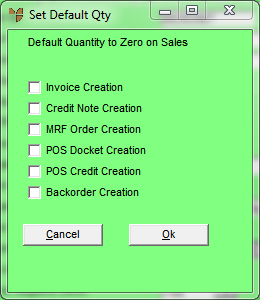
Setting Default Qty to Zero |
2.8 Feature Use this field to determine whether quantity fields throughout Micronet default to 0 or 1 for this user. These settings apply in MDS Invoice Creation, MDS Credit Note Creation, MDS Backorder Creation, POS Order Creation, POS Credit Note Creation and MRF Order Creation. Note that you can have different settings for different areas. Select the browse button (...) next to this field. Micronet displays the Set Default Qty screen.
Check the box for each Micronet process where you want the quantity to default to 0, then select the Ok button. Unchecked options will default to 1 (or to the POS default for POS Docket Creation). Micronet redisplays the User File Update screen with the selections listed in this field. |
|
|
Printer |
Users can have default printers set for different tasks. For each output type (report, invoice, credit note, picking slip, transfer docket, purchase order, courier docket, box label, works order, cheque and remittance advice), select the Change Printer button to select the default printer on which the output will be printed. Micronet lists the available printers. |
|
Can User Change |
For each output type, select Yes if the user can change the default printer each time they print reports. If you select Yes, the user can select any printer normally available on your networks. If you select No, the user is restricted to the default printer. |
|
|
|
Warning If a report format has a default printer set (see "File - Default Printer"), Micronet will only use that printer if users also have a default printer set here. For example, if an invoice format is setup to be printed on a specific printer, you should select an Invoice printer on this screen for each user who prints invoices. Set the Can User Change field to determine whether or not the user can change the default printer. |
|
TZ Offset |
Select the time zone offset from the base Micronet time setting (Australian Eastern Standard Time). For example, for California the setting would be -18hrs. |
|
|
System Date/Time |
Micronet displays the date and time set on your workstation. |
|
|
Date/Time After Offset |
If you selected a TZ Offset, Micronet displays the date and time adjusted for this offset. |
|
|
Date Format |
Select the format in which you want dates displayed throughout Micronet. |